Policies define access, admin rights, and device and DNS settings. They also include assignment criteria that determine when each policy is applied.
Prerequisites
Before you start, configure the following:
Entitlements. Refer to Configure entitlements
Ringfence. Refer to ingfence rules.
Admin roles. Refer to Configuring admin roles.
Customized claims. To set up customized claims for policy assignment criteria, refer to General IdP settings.
Scripts. Create and upload any criteria scripts or user claim scripts, or create assignment criteria expressions.
Adding a policy
To add a policy:
Go to Policies (Access > Policies).
Select +Add and complete the following fields:
Name. Enter a name for the policy.
Notes. Optional. Enter any notes for the policy.
Status. Select Enabled or Disabled.
Tags. Click +Add to add tags to the policy.
Assignment Criteria. Define when the policy is assigned. Select criteria to achieve least-privilege access.
Criteria Combining Mode. Each policy can include one or more criteria expressions. Without scripts, you can combine criteria in three ways:
<all criteria below must be true>: A logical
AND. All criteria must be true.<at least one of the criteria below must be true>: A logical
OR. At least one criterion must be true.<Criteria are met according to custom logic>: A Boolean expression that references multiple criteria.
NOTE
For more complex expressions it is recommended to use Custom Logic. Script mode is available for advanced use cases which may break compatibility with the three list modes.
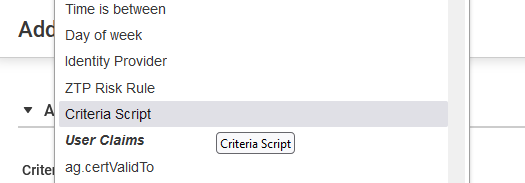
Criteria. Select +Add, then select the criteria type from the Type drop-down list. These claims-based expressions define which user or device the policy applies to. Use static claims that are unlikely to change during the day (for example, directory group membership or email address). Multiple policies can be assigned, so choose criteria carefully to achieve the intended outcome. If you have predefined criteria or user claim scripts, they appear in the assignment criteria list. The built-in script <Everyone> assigns the policy to all users.
For more information, see Configuring conditions.
Continue to complete the fields for the type of policy you are configuring.
Policy type fields
After configuring the initial policy fields, you will define additional settings specific to each type of policy. Select the type of policy you want to configure and complete their fields:
Access Policy
To create an access policy, configure the following fields:
Entitlements. Select entitlements to include in the policy.
Entitlements by Name. Select one or more preconfigured entitlements to include in the policy. Policies can include entitlements that point to multiple Sites.
Entitlements by Tag. Select one or more tags to include all entitlements with matching tag names (set when the entitlement was created). This is useful when you need to associate many entitlements with a policy. You can define entitlements by name and tag at the same time.
Site Settings. Configure how the policy selects a Site for the included entitlements.
Override Site. By default, system uses the Site configured on each entitlements. You can override this and deploy all entitlements in the policy to a specified Site. When you configure an entitlement, you must specify a Site (it tells AppGate ZTNA where to find the resource). Use should use Will not override... (the default) unless you have a specific use case that requires an override Site.
Override with a specific Site. Select a Site from the list.
Override using a claim. Select the claim that returns the Site UUID. You can find the UUID in the browser address bar when you edit the Site. Example URL:
https://my-controller:8443/ui/sites/edit/91894c92-3502-4ab4-870e-d573d0362f48. In this example, the claim value must be91894c92-3502-4ab4-870e-d573d0362f48Override with the nearest Site. The system uses the Site with the nearest geolocation that also has Use for nearest Site selection enabled (configured in Sites). The Controller evaluates the user’s geolocation and adds the entitlements to the token for the nearest Site. The same entitlements must be available on all Sites enabled for nearest Site selection. Enable this feature and specify the Site geolocation Site Data. For more details and examples, see Policies and Tunnel architectures.
Use fallback Site. If a fallback Site is configured, the system uses it when the selected Site is unavailable.
Admin Policy
To create an admin policy, configure the following fields:
Privileges. Allow admin UI and API access to the admin port (default 8443) on Controllers and LogServers.
Admin Roles. Select one or more preconfigured admin roles to provision administrator privileges or access to the Controller REST API.
Device Policy
For more details about device and client controls (including assignment behavior), see Policies. If multiple device policies assign conflicting requirements, such as two different proxy PAC files, the system uses a deterministic tie-break: the policy with whose name is closest to the beginning of the alphabet takes precedence.
To create a device policy, configure the following fields:
Device Configuration.
Apply Device Proxy. Apply a proxy PAC file to the device through the client. Normally, the PAC file should handle traffic that is not configured to be handled by AppGate ZTNA entitlements (for example, traffic sent to a cloud-based web proxy service). Proxy servers can also be located behind the AppGate ZTNA system; if so, add an entitlement for each proxy server. For more information on usage, see Device and client controls.
URL. Enter the PAC file URL. For example,
http://mycompany.com/proxy.pacPersist Config. Enable to leave the PAC file in place even when the client quits. Never enable this if the proxy server is located behind the AppGate ZTNA system.
NOTE
This is only supported on Windows and macOS.
Trusted Network Detection. Select Enable auto-suspend to suspend the client when it is on a trusted network. The client keeps running, but all routes are removed. Ringfence rules and PAC files (if present) are also removed.
DNS Suffix. Enter the DNS suffix. The system checks domains based on the suffix, such as
uk.mycompany.com. It checks the suffix against the domain defined by DHCP option 15, which normally specifies the domain name the client should use as a suffix when resolving hostnames.
NOTE
This is not supported on iOS or Chrome OS.
Tamper Proofing. Enabled by default. While the client is connected, Tamper proofing reimposes AppGate ZTNA-defined routes, ringfence rules, and PAC files if they are altered. It checks every five seconds and restores the correct rules/routes if required. Use caution if the user's local subnet matches a defined route; the user can be repeatably disconnected and reconnected.
Ringfence Rules by Name. Select one or more preconfigured ringfence rules to restrict access to or from the client device.
Ringfence Rules by Tag. Select one or more tags to include all ringfence rules with matching tag names.
Ringfencing mitigates the security risk of malware transmission between user devices on a public network. Ringfence rules block inbound and/or outbound local traffic except traffic required to establish a tunnel to Gateways. Ringfence rules can be applied with entitlements, so it is possible to increase local protection of connecting devices while allowing more restricted access.
For example, to enable an advanced ringfence when users are out of the office, create two complementary policies, such as for a user group to access Skype:
Policy 1 includes: | Assignment criteria with device claims to assign the policy only when the device is connected to the office network | "Block in" (built in) rule applies |
Policy 2 includes: | Assignment criteria with device claims to assign the policy only when the device is not connected to the office network | "External user" rule applies |
For more information on rules, see Ringfence rules.
NOTE
This is not supported on mobile devices.
Client Configuration.
Client Features. Select User controlled or Managed by administrator. Managed by admin hides client features in the UI and presets their values. See the AppGate ZTNA client guide for more details. For more information on usage, see Device and client controls.
Client Help Link. Select Custom to customize the client's help link instead of using the default value.
Client Profile Settings. Managed by administrator allows you to specify which client profiles and client profile groups are imposed on the client for this Collective. The order of the profiles can be set, which is the order they will appear in the client. New profile(s) are received when the entitlement token is renewed and applied at sign-out or the next time the client restarts. For more information on usage, see Client profiles.
DNS Policy
To create a DNS policy, configure the following fields:
DNS Settings. The client uses DNS servers and match domains in the DNS policy to add DNS settings to the local operating system. Unless you use the client DNS auto-configuration option, add an entitlement so the user’s application can access the specified DNS server(s). Leave access control set to Always Allow Action(s).
DNS Entitlements by Name. Select one or more preconfigured entitlements to include in the policy.
DNS Entitlements by Tag. Select one or more tags to include all related entitlements in the policy.
DNS Configurations. Add one or more DNS configurations for the client based on match domains. Systems other than desktops (mobile devices, Portal, and so on) require special syntax to operate correctly. For details about policy-based DNS in the AppGate ZTNA system, see DNS and name resolution.
Match Domain. Enter one or more comma-separated domains. When a domain matches a host definition, the DNS server below is used. If you enter multiple domains, the system creates multiple DNS configurations with the same DNS properties.
DNS Servers. Enter one or more DNS servers for the client to use. Linux tries only the first configured DNS server.
Register the Client's addresses in DNS. Register the mapped tunnel IPs presented by the client with the DNS server for that Site (domain-connected Windows only).
DNS Requests. Select to block local DNS requests.
NOTE
There may be issues when multiple DNS policies are assigned that refer to the same match domain. When multiple conflicting DNS policies are assigned, the policy wi the name closest to the beginning of the alphabet will be used.
Site Settings. Configure how the policy selects a Site for the included entitlements.
Override Site. By default, system uses the Site configured on each entitlements. You can override this and deploy all entitlements in the policy to a specified Site. When you configure an entitlement, you must specify a Site (it tells AppGate ZTNA where to find the resource). Use should use Will not override... (the default) unless you have a specific use case that requires an override Site.
Override with a specific Site. Select a Site from the list.
Override using a claim. Select the claim that returns the Site UUID. You can find the UUID in the browser address bar when you edit the Site. Example URL:
https://my-controller:8443/ui/sites/edit/91894c92-3502-4ab4-870e-d573d0362f48. In this example, the claim value must be91894c92-3502-4ab4-870e-d573d0362f48Override with the nearest Site. The system uses the Site with the nearest geolocation that also has Use for nearest Site selection enabled (configured in Sites). The Controller evaluates the user’s geolocation and adds the entitlements to the token for the nearest Site. The same entitlements must be available on all Sites enabled for nearest Site selection. Enable this feature and specify the Site geolocation Site Data. For more details and examples, see Policies and Tunnel architectures.
Fallback Site. If a fallback Site is configured, the system uses it when the selected Site is unavailable.
Stop Policy
To create a stop policy, configure the following fields:
Profile Removal. Stop access to the Collective temporarily or permanently for user or group of users. For more information on usage, see Policies.
Profiles Handling. When enabled, the client removes all relevant profiles to stop future reconnection attempts.
Managing policies
Enabling or disabling policies
Use the action button—the three dots icon ( ) to the right of each line item—to access the following option:
Enable/disable Policy Status. Sets the policy’s status to Enabled or Disabled.
Actions menu
The Actions menu on the Policies page allows you to perform the following on one or more policies:
Import a policy.
Add or remove tags from one or more policies.
Enable or disable one or more policies.
Split a mixed policy. In version 5.5, mixed policies were replaced by three separate policy types: Access, Admin, and Device. This action analyzes selected mixed policies, creates the corresponding separate policies, and disables the original mixed policy.
Export one or more policies.
Delete one or more policies.
The Actions menu from the Add/Edit Policy page allows you to test, clone, export, or delete the policy.