After you upload the appropriate license(s), complete the following tasks in your AppGate environment that apply to your operational technology (OT) deployment:
Add the Claroty CTD resolver to the Site. (Optional)
Configuring secrets
Credential injection is optional. To use it with Brokered RDP and Brokered SSH entitlements, configure the matching secret type:
For Brokered RDP, a Credentials secret
For Brokered SSH, an SSH key secret
If you use the Claroty CTD resolver, the secret can supply the password.
If you do not use credential injection, leave the Credentials Injection drop-down in the entitlement blank.
Configuring a Brokered RDP secret
Brokered RDP sessions use a Credentials secret. To configure a Credentials secret, complete the following steps:
Go to Secrets (System > Secrets).
Select Add > Credentials.
On the Edit Secret - Credentials page, complete the following fields:
Name. Enter the name that scripts use to reference the secret. Use the format
%SECRET:<name>%. The name cannot contain lowercase letters or spaces. Changing the name can break existing scripts.Notes. Optional. Enter any notes about the secret.
Tags. Select +Add to add tags to the secret.
Username. Enter the username to authenticate with the target resource.
Password. Enter the password for authentication at run time.
Select Save.
Configuring a Brokered SSH secret
Brokered SSH sessions use an SSH Key secret. To configure an SSH Key secret, complete the following steps:
Go to Secrets (System > Secrets).
Select Add > SSH Key.
On the Edit Secret - SSH Key page, complete the following fields:
Name. Enter the name that scripts use to reference to the secret. Use the format
%SECRET:<name>%. The name cannot contain lowercase letters or spaces. Changing the name can break existing scripts.Notes. Optional. Enter any notes about the secret.
Tags. Select +Add to add tags to the secret.
Username. Enter the username to authenticate with the target resource.
SSH Key. Enter the private SSH key for authentication at run time.
Select Save.
Configuring protocol templates
You can use custom protocol templates when you configure an action in a Network entitlement.
You can open the protocol templates list from a Network entitlement or from the Actions menu:
From a Network entitlement
Select +Add to add an action to the entitlement.
If the protocol already exists, select it from the Protocol drop-down. Existing protocols appear under Templates.
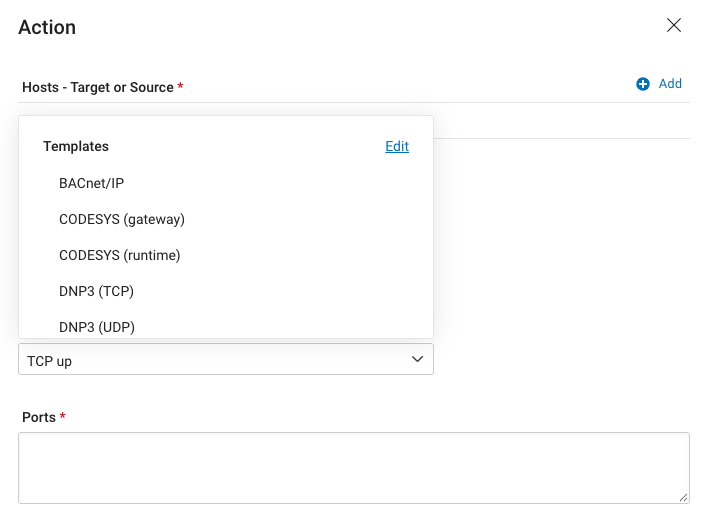
To create or edit a protocol, select Edit in the in the upper-right corner of the protocol list. The Protocol Templates window opens.
In the Protocol Templates window, edit an existing protocol, or select +Add to create one.

To add a protocol, complete the following fields:
Protocol Name. Enter a name.
Transport Protocol. Select the transport protocol from the drop-down.
Port. Enter one or more ports.
Select Save. AppGate ZTNA adds the protocol to the Protocol drop-down list and populates the Ports field in the Action window.
From the Actions menu
You can also create a protocol from the Actions menu on the Entitlements page.
Select Actions > Protocol Templates.
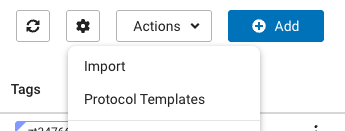
In the Protocol Templates window, select +Add to add a protocol.
Complete the following fields:
Protocol Name. Enter a name.
Transport Protocol. Select a transport protocol, such as TCP Up or TCP Down.
Port. Enter one or more ports.
Select Save. AppGate ZTNA adds the protocol to the Protocol drop-down list in the entitlement’s Action window.
Configuring entitlements
You can use a standard Network entitlement, a Brokered RDP entitlement, or a Brokered SSH entitlement.
NOTE
Changes to a brokered entitlement apply to new sessions only. To apply a change to an active session, terminate the session and have the user start a new one.
Configuring Brokered RDP entitlements
To configure a Brokered RDP entitlement, go to the Entitlements page (Access > Entitlements), select Add > Brokered RDP entitlement, and complete the following fields:
Name. Enter a name for the entitlement.
Notes. Optional. Add any usage notes for the entitlement.
Status. Select Enabled or Disabled.
Tags. Select +Add to add tags.
Access Configuration
Site. Select the Site for the entitlement. An entitlement normally applies to one Site. Hostnames, URLs, resource names, and scripts used in actions are resolved based on Site-specific configurations. Even if you plan to use an EXCLUDE action, you need a Site to resolve excluded IP addresses.
Host. Enter an IP address, hostname, DNS name, resolver, or entitlement script. When the host resolves to more than one IP address, AppGate ZTNA creates one shortcut for each resolved IP address. See Shortcut names for hosts with multiple IP addresses.
If you use the Claroty CTD resolver, enter the host name directly with the
claroty-ctd://prefix.
NOTE
AppGate ZTNA limits the number of shortcuts it creates for one host to 10. When a host resolves to more than 10 IP addresses, AppGate ZTNA does not create shortcuts for the remaining IP addresses.
Port. Enter one or more comma-separated ports, port ranges, or entitlement scripts. The default is
3389.Monitoring and Recording. This setting requires a Session Governance license for the user. Each option includes a default message in the Disclosure Message box. You can use the default message or edit it. Select from the following:
None. Turns off session monitoring and recording.
Monitor only. Enables session monitoring.
Record only. Enables session recording
Monitor and record. Enables both session monitoring and recording.
CAUTION
The Gateway stores recordings, and recording length has no limit. Monitor Gateway disk usage, because a full disk prevents recorded sessions from starting.
Credentials Injection. From the drop-down list, select the Credentials secret that you configured. If you do not use credential injection, leave this field blank.
Access Constraints
Access Control. Select one of the following:
Always allow actions.
Condition-based access. Select +Add to add a condition to the entitlement and select how it is applied.
Shortcut Configuration
Shortcut Name. Enter the name that will appear in the client. To avoid truncation on smaller screens, limit the name to about 12–16 characters. If the host resolves to multiple IP addresses, you can add placeholders to the name. See Shortcut names for hosts with multiple IP addresses.
Shortcut Description. Enter the text that appears when the user opens the shortcut details.
Shortcut Group. Shortcuts in the same group appear together in the client.
Icon Color. Select a standard color for the launch icon.
Preview. Shows how the shortcut appears in the client. Devices with larger screens show more characters.
RDP Parameters
Configure the following session settings:
Resolution. The screen resolution of the RDP session window. The default is 1280×720.
Color Depth. The number of colors displayed in the session. Higher color depth improves image quality but uses more bandwidth. The default is 16-bit.
Audio Redirection. Whether audio from the target host plays on the user device. The default is Disabled.
Keyboard Layout. The keyboard layout the session uses, such as en-us-qwerty. Select Server default to use the layout configured on the target host. The default is Server default.
Windows Domain. The Windows domain used to authenticate the user on the target host. Leave this field empty if the target host does not use a domain.
Security Mode. The security protocol used to connect to the target host. Network Level Authentication (NLA) requires the user to authenticate before the session starts. Select ANY to use the mode the target host supports. The default is NLA.
Clipboard Sharing. Whether users can copy and paste between their device and the RDP session. The default is Disabled.
File Transfer. Whether users can transfer files between their device and the target host during the session. When you enable file transfer, the user device appears as a drive in the session. The default is Disabled.
Idle Timeout. How long a session can be inactive before it ends. The default is 30 minutes.
Shortcut names for hosts with multiple IP addresses
By default, AppGate ZTNA adds a sequential number to the end of each shortcut name. It also adds the resolved IP address to the end of each shortcut description. This default applies when the Shortcut Name field contains no placeholders.
To control how AppGate ZTNA names each shortcut, enter one or more of the following placeholders in the Shortcut Name field:
Placeholder | Replaced with |
|---|---|
| The resolved IP address |
| The hostname that resolved to the IP address |
| The sequential number of the shortcut, starting at 1 |
The following table shows the shortcuts that AppGate ZTNA creates for the host scada.internal.local, which resolves to 10.0.1.10, 10.0.1.11, and 10.0.1.12:
Placeholders used | Shortcut Name value | Shortcuts created |
|---|---|---|
None |
| SCADA-RDP 1, SCADA-RDP 2, SCADA-RDP 3 |
Index |
| SCADA-RDP 1, SCADA-RDP 2, SCADA-RDP 3 |
IP |
| SCADA-RDP 10.0.1.10, SCADA-RDP 10.0.1.11, SCADA-RDP 10.0.1.12 |
Hostname and IP |
| scada.internal.local (10.0.1.10), scada.internal.local (10.0.1.11), scada.internal.local (10.0.1.12) |
Configuring Brokered SSH entitlements
To configure a Brokered SSH entitlement, go to the Entitlements page (Access > Entitlements), select Add > Brokered SSH entitlement, and complete the following fields:
Name. Enter a name for the entitlement.
Notes. Optional. Add any usage notes for the entitlement.
Status. Select Enabled or Disabled.
Tags. Select +Add to add tags.
Access Configuration
Site. Select the Site for the entitlement. An entitlement normally applies to one Site. Hostnames, URLs, resource names, and scripts used in actions are resolved based on Site-specific configurations. Even if you plan to use an EXCLUDE action, you need a Site resolve excluded IP addresses.
Host. Enter an IP address, hostname, DNS name, resolver, or entitlement script. When the host resolves to more than one IP address, AppGate ZTNA creates one shortcut for each resolved IP address. See Shortcut names for hosts with multiple IP addresses.
If you use the Claroty CTD resolver, enter the host name directly with the
claroty-ctd://prefix.
NOTE
AppGate ZTNA limits the number of shortcuts it creates for one host to 10. When a host resolves to more than 10 IP addresses, AppGate ZTNA does not create shortcuts for the remaining IP addresses.
Port. Enter one or more comma-separated ports, port ranges, or entitlement scripts. The default is
22.Monitoring and Recording. This setting requires a Session Governance license for the user. Each option includes a default message in the Disclosure Message box. You can use the default message or edit it. Select from the following:
None. Turns off session monitoring and recording.
Monitor only. Enables session monitoring.
Record only. Enables session recording
Monitor and record. Enables both session monitoring and recording.
CAUTION
The Gateway stores recordings, and recording length has no limit. Monitor Gateway disk usage, because a full disk prevents recorded sessions from starting.
Credentials Injection. From the drop-down list, select the SSH Key secret that you configured. If you do not use credential injection, leave this field blank.
Access Constraints
Access Control. Select one of the following:
Always allow actions.
Condition-based access. Select +Add to add a condition to the entitlement and select how it is applied.
Shortcut Configuration
Shortcut Name. Enter the name that will appear in the client. To avoid truncation on smaller screens, limit the name to about 12–16 characters. If the host resolves to multiple IP addresses, you can add placeholders to the name. See Shortcut names for hosts with multiple IP addresses.
Shortcut Description. Enter the text that appears when the user opens the shortcut details.
Shortcut Group. Shortcuts in the same group appear together in the client.
Icon Color. Select a standard color for the launch icon.
Preview. Shows how the shortcut appears in the client. Devices with larger screens show more characters.
SSH Parameters
Configure the following session settings:
Terminal Type. The terminal type that the session reports to the target host. The target host uses this value to decide which colors and display features to send. The default is xterm-256 color.
Keepalive Interval. How often the Gateway sends keepalive messages to the target host. Keepalive messages prevent the target host, or network devices between the Gateway and the target, from closing an inactive session. The default is 30sec.
Host Key Verification Policy. How the Gateway checks the target host key before it connects. When this policy is ENFORCED, the Gateway does not connect if it cannot verify the host key. The default is ENFORCED.
Clipboard Sharing. Whether users can copy and paste text between their device and the SSH session. The default is Disabled.
File Transfer. Whether users can transfer files between their device and the target host during the session. The default is Disabled.
Idle Timeout. How long a session can be inactive before it ends. The default is 30 minutes.
Shortcut names for hosts with multiple IP addresses
By default, AppGate ZTNA adds a sequential number to the end of each shortcut name. It also adds the resolved IP address to the end of each shortcut description. This default applies when the Shortcut Name field contains no placeholders.
To control how AppGate ZTNA names each shortcut, enter one or more of the following placeholders in the Shortcut Name field:
Placeholder | Replaced with |
|---|---|
| The resolved IP address |
| The hostname that resolved to the IP address |
| The sequential number of the shortcut, starting at 1 |
The following table shows the shortcuts that AppGate ZTNA creates for the host scada.internal.local, which resolves to 10.0.1.10, 10.0.1.11, and 10.0.1.12:
Placeholders used | Shortcut Name value | Shortcuts created |
|---|---|---|
None |
| SCADA-SSH 1, SCADA-SSH 2, SCADA-SSH 3 |
Index |
| SCADA-SSH 1, SCADA-SSH 2, SCADA-SSH 3 |
IP |
| SCADA-SSH 10.0.1.10, SCADA-SSH 10.0.1.11, SCADA-SSH 10.0.1.12 |
Hostname and IP |
| scada.internal.local (10.0.1.10), scada.internal.local (10.0.1.11), scada.internal.local (10.0.1.12) |
Adding the Claroty CTD resolver
Before you can use the Claroty CTD resolver, configure it in a Site.
After you configure the resolver, add it to your entitlements:
Create or edit a Network, Brokered RDP, or Brokered SSH entitlement on the Site where the resolver is configured.
When you add an action, add a host:
In a Network entitlement, under Help with Creating Name by Resolver, select Claroty CTD to open the builder. Select the resource type, such as assets, or define the filter. Alternatively, enter the host name directly with the
claroty-ctd://prefix.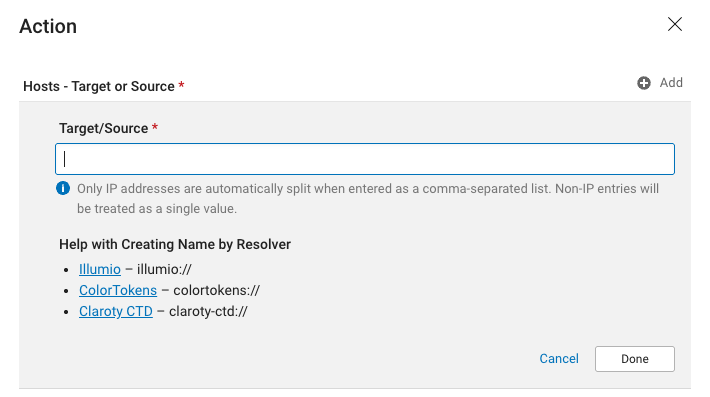
In a Brokered RDP or Brokered SSH entitlement, enter the host name directly with the
claroty-ctd://prefix.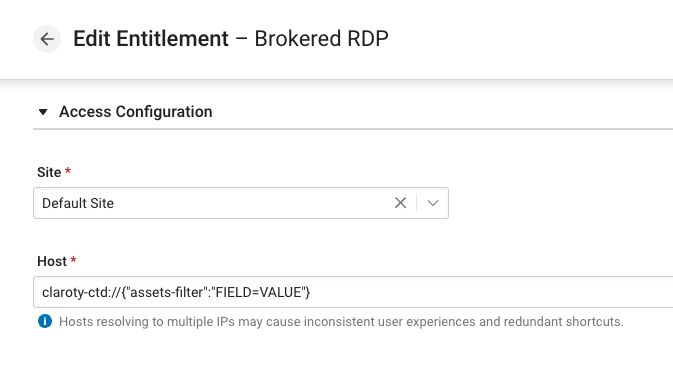
Select Done, then test the host to confirm that it resolves to the expected IP addresses.
Example host name: claroty-ctd://{"assets-filter":"name__exact=EXPDEV1"}
For more information about the Claroty CTD resolver and its syntax, see Resource names.