Entitlements define which resources users or devices can access on a Site. Entitlements include actions (access rules) and can also include app shortcuts shown in the client.
Prerequisites
Before you create entitlements, configure the following:
Sites. If you use URL access (HTTP up actions), you need a PKCS #12 file for the URLs you plan to protect. For details, see Tunneling.
Name resolvers. Configure Sites first so the correct options appear when you configure the entitlement action. Also configure your cloud platform so AppGate ZTNA can discover resources types and their values, such as tag names.
Entitlement scripts. Upload scripts you plan to use, and verify that any host definitions in those scripts are correct.
Conditions. Configure conditions first so you can reference them when you configure access control.
Consider the effect on RAM usage when you decide how many entitlements to create.
Adding an entitlement
To create an entitlement, go to the Entitlements page (Access > Entitlements), select +Add and select the type of entitlement you want to configure:
Network entitlement
Complete the following fields to create a Network entitlement:
Name. Enter a name for the entitlement.
Notes. Optional. Add any usage notes for the entitlement.
Status. Select Enabled or Disabled.
Tags. Click +Add to add tags.
Access Configuration
Site. An entitlement normally applies to one Site. Hostnames, URLs, resource names, and scripts used in actions are resolved based on Site-specific configurations.
NOTE
Even if you plan to use an EXCLUDE action, a Site is still needed to resolve excluded IPs.
Actions. Actions define the network access rights. The default rule is ALLOW. You can also specify BLOCK, ALERT, or EXCLUDE.
Entitlements include actions. In each action, you can define one or more hosts by using IP addresses, subnets, hostnames, URLs, resource names (cloud resolvers), or host entitlement scripts. Resource names and entitlement scripts support dynamic least-privilege access, which lets the system adapt in near real time to infrastructure changes.
Action settings. Each action is assigned a reference number (#0, #1, and so on). Use these numbers to correlate what you configured in the entitlement with what appears later in session details and audit logs—for example, when the action shows a script but session details show a resolved IP address. Reference numbers do not set priority or precedence. For precedence rules, see Overlapping entitlements. For host details, see Defining hosts.
Hosts - Target or Source. Add one or more host definitions. For UP protocols this will be the Target, for DOWN protocols this will be the Source.
Target/Source. Enter one or more comma-separated host definitions. Only IP addresses are automatically split when entered as a comma-separated list. Non-IP entries are treated as a single value.
Type | Example | Usage |
|---|---|---|
IP address |
| Use 0.0.0.0/0 only when the Site has default gateway enabled. To capture all traffic in other scenarios, use two entitlements: 0.0.0.0/1 and 128.0.0.0/1. Traffic to these reserved IP address ranges is not allowed:
|
Hostname |
| In some cases, you must use specific domain syntax (including for SaaS providers). Although short names might resolve on Windows, do not use short names in AppGate ZTNA entitlements. |
URL (FQDN) |
| URL access operates as a reverse proxy. The appliance requires a PKCS#12 file to terminate http(s) connections, decrypt and filter URLs, and then establish an onward https connection to the protected hosts. URL access supports multiple PKCS#12 files. Each file must include a certificate (for the protected host) signed by a trusted CA and the private key. As an alternative, you can use a wildcard certificate, but limit its scope due to the security impact if it is compromised.
|
Resource name |
| See Resource names for the required syntax. Or use Create Name by Resolver to help generate the JSON syntax automatically. |
Host entitlement script |
| You can derive any of the host definitions above from a host entitlement script. Before you reference a script, upload it. For details, see Entitlement scripts. |
You can test your name resolver syntax in Sites.
You can define multiple host definitions of the same type. For each type, the system uses resolvers in the order shown and stops after the first valid result.
Create Name by Resolver. Select a resolver type (defined for the Site), then select the Resource Type, Name/ID, and Value. If resolvers are configured for the selected Site, they appear in the list. When you select one, the JSON builder queries the provider in real time to discover valid resource types, names/IDs, and values. Use the builder to reduce typing errors. You might need to edit the JSON to achieve the desired result.
In Azure and AWS, tags use key:value pairs. For tag-based queries, set both the tag key and tag value.
In AWS, the builder supports regions and accounts, but these are qualifiers, not resources. You must still specify an actual resource (entered manually or copied from another JSON resource name that includes a resource).
Similarly, in GCP, project IDs are qualifiers. You must still specify actual resources.
Example: If you select project IDs, you get a name like gcp://{"projects-filter":"id:appgate"}. If you select instance network tags, you get a name like gcp://{"instances-network-tags":"prometheus"}. You can combine them to create the final JSON syntax: gcp://{"projects-filter":"id:appgate","instances-network-tags":prometheus"}
Rule. ALLOW is the default. You can also select BLOCK, ALERT (alert and block) to monitor irregular network traffic, or EXCLUDE to avoid routing traffic.
Entitlements specify which rule applies to the defined hosts:
No rule found. As with most firewalls, if you do not define a rule, the Gateway denies access by default when the client sends traffic to it.
In audit logs, this reports
action:dropIn the web client (Portal), this sends an RST to the client and reports
action:reject
ALLOW. Routes client traffic through the firewall and allows it to pass.
In audit logs, thisl normally reports
action:allowIf the linked condition is about to expire (within 5 minutes), audit logs report
action:allow_reportIf the linked condition is not met (or has expired), audit logs report
action:block_report
BLOCK. Use to prevent access to specific hosts within an allowed range, or to invoke route optimization in the client.
In audit logs, this reports
action:block
ALERT. Detect traffic that matches the specified hosts. ALERT includes an implied BLOCK. It also sets a local claim on the appliance (which triggers reevaluation). You can use this claim to trigger a response from an external SIEM system.
In audit logs, this reports
action:block_report
NOTE
This claim is not shared at the Collective level. A Gateway in a Site might have the claim set for a given user, but after a roaming event, the user might connect to a different Gateway where the claim is not set.
EXCLUDE. Applies only to local routes on the client (and is handled by the host operating system). This is useful when you route all traffic through the tunnel (default gateway) but want to exclude specific applications—for example, video meetings that you define by using the
*.domain.comhost syntax. It can also be useful to exclude a subdomain from a larger allowed domain.This does not appear in audit logs because the traffic never reaches the Gateway.
NOTE
EXCLUDE does not change firewall rules on the Gateway. Features that require traffic to reach the Gateways (such as user interactions) do not work with EXCLUDE.
Protocol. Select the protocol and direction. If you have an Operational Technology feature license, you can also select a protocol template. See Using protocol templates for more information. The default value, TCP up, allows traffic from the client to the Gateway. Depending on the protocol, you might need to enter additional parameters:
NOTE
Down rules do not always work—for example, when you use source NAT on a Site or use the Express Connector.
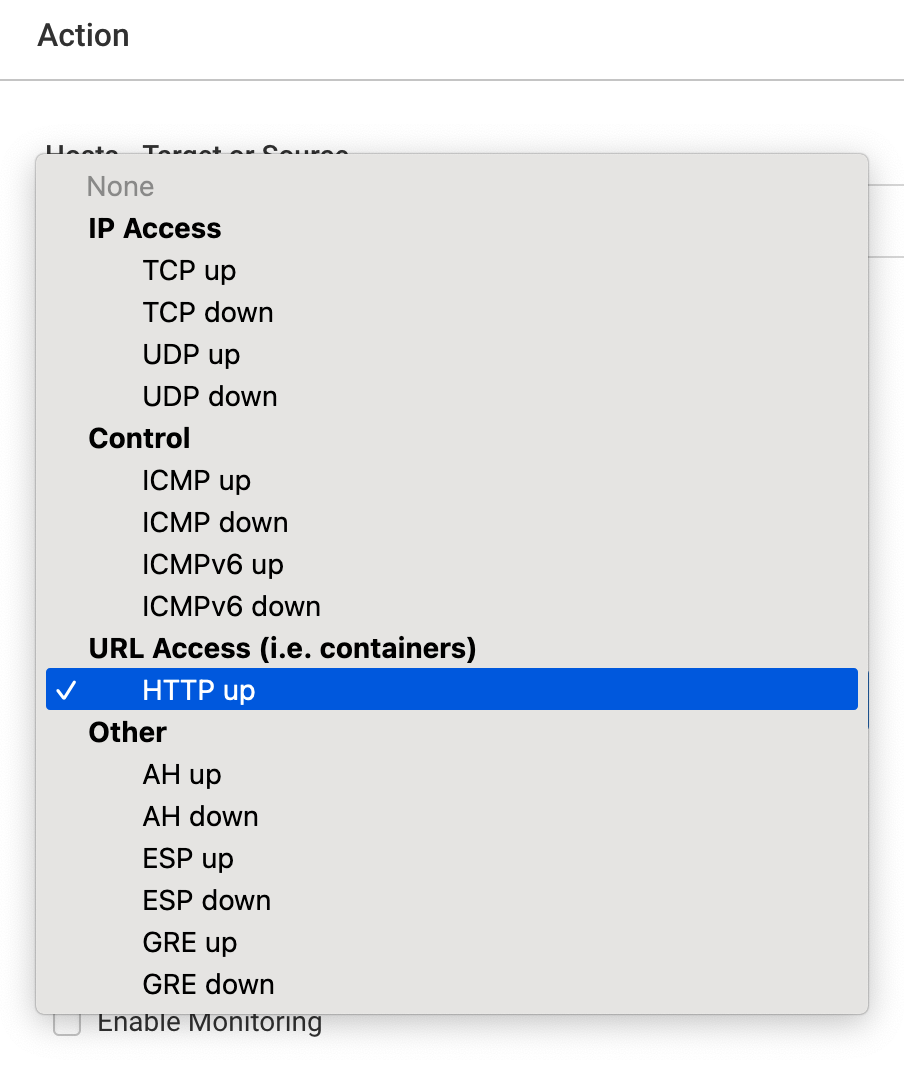
Ports. Enter one or more comma-separated ports, port ranges, or entitlement scripts.
Types. Enter any combination of ICMP types, type ranges, or entitlement scripts (comma-separated). For ICMP type numbers, see: Internet Control Message Protocol
NOTE
If you use a port or type entitlement script (entered as
script://name), upload the script first. For details, see Entitlement Scripts.
Methods. Restrict allowed HTTP methods to match the protected web service (for example, GET, POST, and HEAD).
Specify. Select one or more allowed HTTP methods.

Enable monitoring. Monitor TCP and HTTP return traffic and mark an action as unhealthy. This can trigger client failover to another Gateway. Limit monitoring to a few critical applications that:
Trigger a warning in the dashboard and show the Gateway as unhealthy when 25% or more of users on a Gateway report the same action as unhealthy.
Can cause the client to fail over to another Gateway, depending on what the client knows about the health state of other Gateways.
NOTE
Monitoring has the following requirements: The action must define a single network resource. Ranges count as a single definition (for example, 10.1.2.3 and 10.1.2.0/24 are valid). Comma-separated IP address lists are not allowed. Hostnames and resource names must resolve to a single network resource.
Response Timeout (seconds). Set monitoring sensitivity. Shorter timeouts make unhealthy detection more sensitive.
Access Control. Select how the system controls access to this entitlement.
Always allow action(s). Always permit the action. Consider stricter access controls to protect resources. This is the default.
Condition-based access. Combine one or more predefined conditions to determine the outcome (or trigger user interactions). Conditions must be preconfigured before using them. Conditions support two combining modes:
all below are true: Logical AND. All conditions must be true.
any below are true: Logical OR. At least one condition must be true.
NOTE
If you select condition-based access and set it to None, the system shows Never allow actions(s) for this entitlement.
Client App Shortcuts
Configure client app shortcuts in the following fields:
Static Shortcuts. Add clickable app shortcuts that appear in the client. Shortcuts help users launch resources without memorizing or bookmarking URLs or URIs. Clients display shortcuts across multiple pages. Users can pin favorite shortcuts to show them on the first page. In addition to
http://andhttps://, AppGate ZTNA supportsrdp://andssh://.
App shortcuts are optional. If you only need background connectivity (for example, to a /24 network), you might not need shortcuts. However, you can include multiple shortcuts in one entitlement, so you can still publish frequently used applications within that network.
Shortcut Name. This name appears in the client. Keep it short (about 12–16 characters) to avoid truncation on smaller screens.
Shortcut Group. Grouped shortcuts appear together in the client.
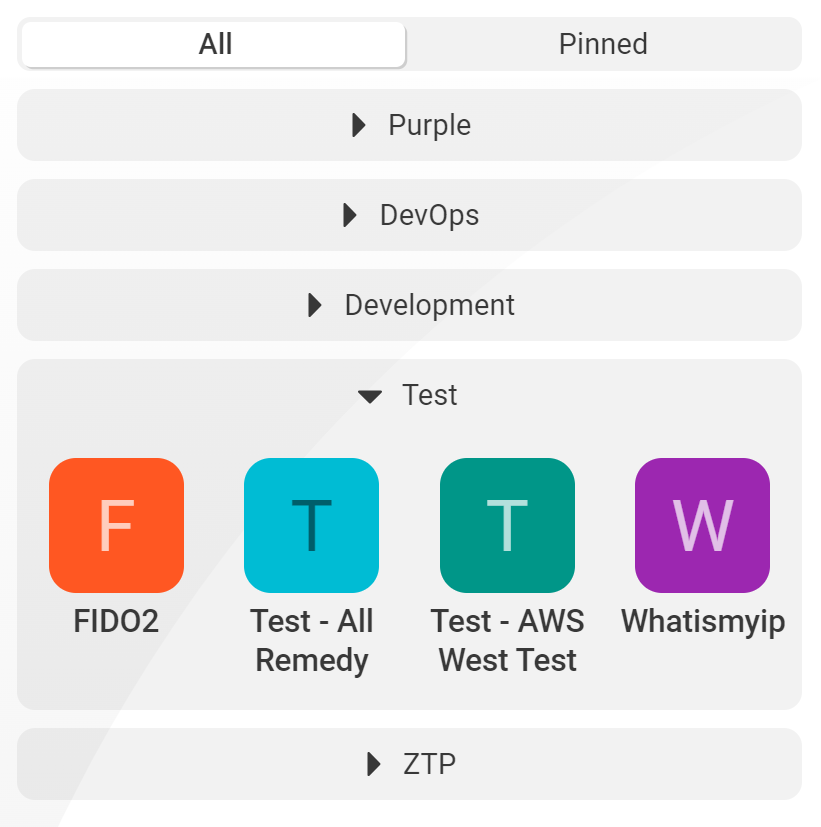
Groups appear before ungrouped shortcuts. Groups are listed in alphabetical order, with numbers sorted before letters.
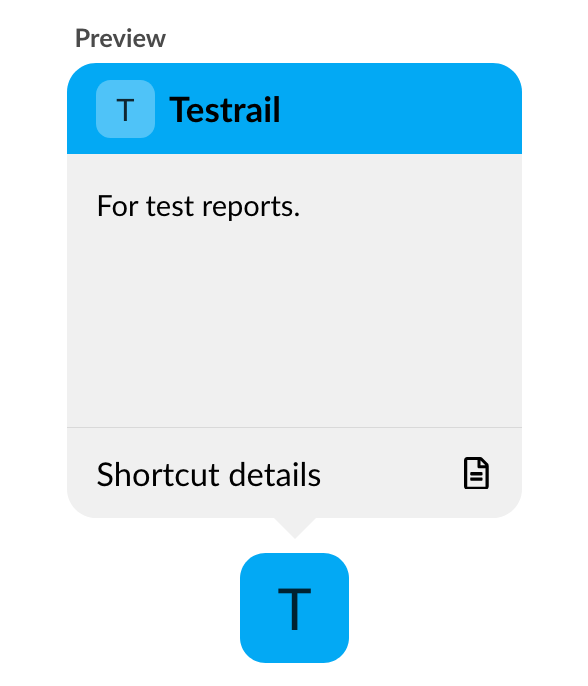
Shortcut Description. This text appears when the user opens shortcut details.
The following HTML tags are supported: 'a', 'b', 'i', 'strike', 's', 'strong', 'small', 'del', 'sub', 'sup', 'br', 'code', 'ol', 'ul', 'li', 'dl', 'dt', 'dd'
Shortcut URL. This URL or URI launches the app. Typically,
http://orhttps://launches the default browser. AppGate ZTNA supports any URI in the form<scheme>://<more>if<more>meets the syntax requirements in Java.net Class URI and passes validation.
Other handling depends on the user’s operating system. Some operating systems register common URI schemes by default. For example, macOS opens Terminal for ssh://host and Finder for smb://host/folder. Some applications register URI schemes during installation (for example, Microsoft Remote Desktop registers rdp://). Windows typically supports fewer schemes. The AppGate ZTNA client includes built-in support for Windows for ssh:// and rdp://. If these schemes are not already registered, the client registers mstsc.exe for rdp:// and either PuTTY or Windows Command Prompt for ssh://.
Example: ssh://my_linux_server.my_company
For rdp://, the AppGate ZTNA client honors several parameters described at Remote Desktop URI scheme to help keep behavior consistent across operating systems.
Supported parameters | Windows | macOS | iOS | Android/ChromeOS |
|---|---|---|---|---|
| ✓ | ✓ | ✓ | ✓ |
| ✓ | ✓ | ||
| ✓ | ✓ | ✓ | ✓ |
| ✓ | ✓ | ||
| ✓ | ✓ | ||
| ✓ | ✓ | ||
| ✓ | ✓ |
Separate RDP parameters with an ampersand (&). For example:
rdp://full%20address=s:10.1.23.45:3389&screen%20mode%20id=i:2
Icon Color. Select a standard color for the launch icon.
Preview. Shows the shortcut appearance. Larger screen devices will show more characters.
Dynamic Shortcuts from Entitlement Scripts. Select an app shortcut entitlement script to define what appears in the client. You can use dynamic shortcuts together with the static shortcuts described above. Upload the app shortcut entitlement script before you reference it.
Brokered RDP entitlement
NOTE
The Brokered Access license is required to use Brokered RDP entitlements.
Name. Enter a name for the entitlement.
Notes. Optional. Add any usage notes for the entitlement.
Status. Select Enabled or Disabled.
Tags. Select +Add to add tags.
Access Configuration
Site. Select the Site for the entitlement. An entitlement normally applies to one Site. Hostnames, URLs, resource names, and scripts used in actions are resolved based on Site-specific configurations. Even if you plan to use an EXCLUDE action, you need a Site to resolve excluded IP addresses.
Host. Enter an IP address, hostname, DNS name, resolver, or entitlement script. When the host resolves to more than one IP address, AppGate ZTNA creates one shortcut for each resolved IP address. See Shortcut names for hosts with multiple IP addresses.
If you use the Claroty CTD resolver, enter the host name directly with the
claroty-ctd://prefix.
NOTE
AppGate ZTNA limits the number of shortcuts it creates for one host to 10. When a host resolves to more than 10 IP addresses, AppGate ZTNA does not create shortcuts for the remaining IP addresses.
Port. Enter one or more comma-separated ports, port ranges, or entitlement scripts. The default is
3389.Monitoring and Recording. This setting requires a Session Governance license for the user. Each option includes a default message in the Disclosure Message box. You can use the default message or edit it. Select from the following:
None. Turns off session monitoring and recording.
Monitor only. Enables session monitoring.
Record only. Enables session recording
Monitor and record. Enables both session monitoring and recording.
CAUTION
The Gateway stores recordings, and recording length has no limit. Monitor Gateway disk usage, because a full disk prevents recorded sessions from starting.
Credentials Injection. From the drop-down list, select the Credentials secret that you configured. If you do not use credential injection, leave this field blank.
Access Constraints
Access Control. Select one of the following:
Always allow actions.
Condition-based access. Select +Add to add a condition to the entitlement and select how it is applied.
Shortcut Configuration
Shortcut Name. Enter the name that will appear in the client. To avoid truncation on smaller screens, limit the name to about 12–16 characters. If the host resolves to multiple IP addresses, you can add placeholders to the name. See Shortcut names for hosts with multiple IP addresses.
Shortcut Description. Enter the text that appears when the user opens the shortcut details.
Shortcut Group. Shortcuts in the same group appear together in the client.
Icon Color. Select a standard color for the launch icon.
Preview. Shows how the shortcut appears in the client. Devices with larger screens show more characters.
RDP Parameters
Configure the following session settings:
Resolution. The screen resolution of the RDP session window. The default is 1280×720.
Color Depth. The number of colors displayed in the session. Higher color depth improves image quality but uses more bandwidth. The default is 16-bit.
Audio Redirection. Whether audio from the target host plays on the user device. The default is Disabled.
Keyboard Layout. The keyboard layout the session uses, such as en-us-qwerty. Select Server default to use the layout configured on the target host. The default is Server default.
Windows Domain. The Windows domain used to authenticate the user on the target host. Leave this field empty if the target host does not use a domain.
Security Mode. The security protocol used to connect to the target host. Network Level Authentication (NLA) requires the user to authenticate before the session starts. Select ANY to use the mode the target host supports. The default is NLA.
Clipboard Sharing. Whether users can copy and paste between their device and the RDP session. The default is Disabled.
File Transfer. Whether users can transfer files between their device and the target host during the session. When you enable file transfer, the user device appears as a drive in the session. The default is Disabled.
Idle Timeout. How long a session can be inactive before it ends. The default is 30 minutes.
Shortcut names for hosts with multiple IP addresses
By default, AppGate ZTNA adds a sequential number to the end of each shortcut name. It also adds the resolved IP address to the end of each shortcut description. This default applies when the Shortcut Name field contains no placeholders.
To control how AppGate ZTNA names each shortcut, enter one or more of the following placeholders in the Shortcut Name field:
Placeholder | Replaced with |
|---|---|
| The resolved IP address |
| The hostname that resolved to the IP address |
| The sequential number of the shortcut, starting at 1 |
The following table shows the shortcuts that AppGate ZTNA creates for the host scada.internal.local, which resolves to 10.0.1.10, 10.0.1.11, and 10.0.1.12:
Placeholders used | Shortcut Name value | Shortcuts created |
|---|---|---|
None |
| SCADA-RDP 1, SCADA-RDP 2, SCADA-RDP 3 |
Index |
| SCADA-RDP 1, SCADA-RDP 2, SCADA-RDP 3 |
IP |
| SCADA-RDP 10.0.1.10, SCADA-RDP 10.0.1.11, SCADA-RDP 10.0.1.12 |
Hostname and IP |
| scada.internal.local (10.0.1.10), scada.internal.local (10.0.1.11), scada.internal.local (10.0.1.12) |
Brokered SSH entitlement
NOTE
The Brokered Access license is required to use Brokered SSH entitlements.
Name. Enter a name for the entitlement.
Notes. Optional. Add any usage notes for the entitlement.
Status. Select Enabled or Disabled.
Tags. Select +Add to add tags.
Access Configuration
Site. Select the Site for the entitlement. An entitlement normally applies to one Site. Hostnames, URLs, resource names, and scripts used in actions are resolved based on Site-specific configurations. Even if you plan to use an EXCLUDE action, you need a Site resolve excluded IP addresses.
Host. Enter an IP address, hostname, DNS name, resolver, or entitlement script. When the host resolves to more than one IP address, AppGate ZTNA creates one shortcut for each resolved IP address. See Shortcut names for hosts with multiple IP addresses.
If you use the Claroty CTD resolver, enter the host name directly with the
claroty-ctd://prefix.
NOTE
AppGate ZTNA limits the number of shortcuts it creates for one host to 10. When a host resolves to more than 10 IP addresses, AppGate ZTNA does not create shortcuts for the remaining IP addresses.
Port. Enter one or more comma-separated ports, port ranges, or entitlement scripts. The default is
22.Monitoring and Recording. This setting requires a Session Governance license for the user. Each option includes a default message in the Disclosure Message box. You can use the default message or edit it. Select from the following:
None. Turns off session monitoring and recording.
Monitor only. Enables session monitoring.
Record only. Enables session recording
Monitor and record. Enables both session monitoring and recording.
CAUTION
The Gateway stores recordings, and recording length has no limit. Monitor Gateway disk usage, because a full disk prevents recorded sessions from starting.
Credentials Injection. From the drop-down list, select the SSH Key secret that you configured. If you do not use credential injection, leave this field blank.
Access Constraints
Access Control. Select one of the following:
Always allow actions.
Condition-based access. Select +Add to add a condition to the entitlement and select how it is applied.
Shortcut Configuration
Shortcut Name. Enter the name that will appear in the client. To avoid truncation on smaller screens, limit the name to about 12–16 characters. If the host resolves to multiple IP addresses, you can add placeholders to the name. See Shortcut names for hosts with multiple IP addresses.
Shortcut Description. Enter the text that appears when the user opens the shortcut details.
Shortcut Group. Shortcuts in the same group appear together in the client.
Icon Color. Select a standard color for the launch icon.
Preview. Shows how the shortcut appears in the client. Devices with larger screens show more characters.
SSH Parameters
Configure the following session settings:
Terminal Type. The terminal type that the session reports to the target host. The target host uses this value to decide which colors and display features to send. The default is xterm-256 color.
Keepalive Interval. How often the Gateway sends keepalive messages to the target host. Keepalive messages prevent the target host, or network devices between the Gateway and the target, from closing an inactive session. The default is 30sec.
Host Key Verification Policy. How the Gateway checks the target host key before it connects. When this policy is ENFORCED, the Gateway does not connect if it cannot verify the host key. The default is ENFORCED.
Clipboard Sharing. Whether users can copy and paste text between their device and the SSH session. The default is Disabled.
File Transfer. Whether users can transfer files between their device and the target host during the session. The default is Disabled.
Idle Timeout. How long a session can be inactive before it ends. The default is 30 minutes.
Shortcut names for hosts with multiple IP addresses
By default, AppGate ZTNA adds a sequential number to the end of each shortcut name. It also adds the resolved IP address to the end of each shortcut description. This default applies when the Shortcut Name field contains no placeholders.
To control how AppGate ZTNA names each shortcut, enter one or more of the following placeholders in the Shortcut Name field:
Placeholder | Replaced with |
|---|---|
| The resolved IP address |
| The hostname that resolved to the IP address |
| The sequential number of the shortcut, starting at 1 |
The following table shows the shortcuts that AppGate ZTNA creates for the host scada.internal.local, which resolves to 10.0.1.10, 10.0.1.11, and 10.0.1.12:
Placeholders used | Shortcut Name value | Shortcuts created |
|---|---|---|
None |
| SCADA-SSH 1, SCADA-SSH 2, SCADA-SSH 3 |
Index |
| SCADA-SSH 1, SCADA-SSH 2, SCADA-SSH 3 |
IP |
| SCADA-SSH 10.0.1.10, SCADA-SSH 10.0.1.11, SCADA-SSH 10.0.1.12 |
Hostname and IP |
| scada.internal.local (10.0.1.10), scada.internal.local (10.0.1.11), scada.internal.local (10.0.1.12) |
Using protocol templates
NOTE
You must have an Operational Technology feature license to use protocol templates.
When adding an action to a Network entitlement, you can optionally use a protocol template. You can also add or edit templates from this menu.
When configuring the Network entitlement, select +Add to add an action.
When selecting the Protocol, if the template already exists in the system, select it from the drop-down. They are listed under Templates.
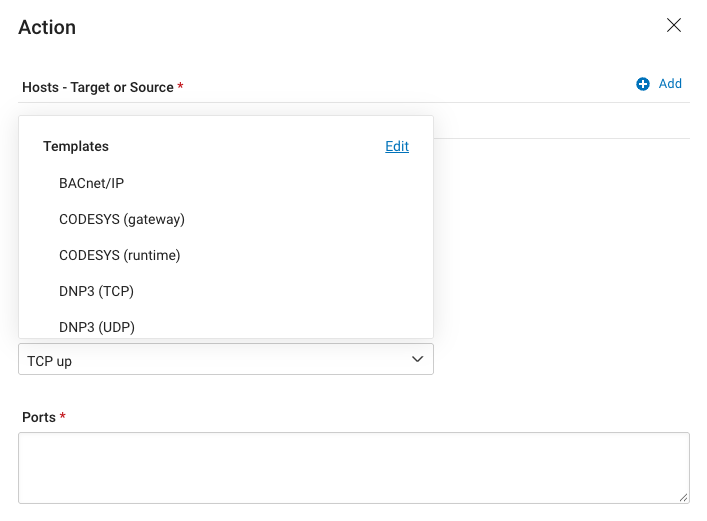
If you need to create or edit a protocol, select Edit in the top right of the list of protocols to open the Protocol Templates window.
In the Protocol Templates window, you can edit existing protocols or select +Add to create one.

To add a protocol, complete the following fields:
Protocol Name. Enter a name.
Transport Protocol. Select the transport protocol from the drop-down.
Port. Enter the port(s).
Select Save, and the protocol is added to the Protocol drop-down list. When selected, it populates the drop-down and the Ports field in the Action window.
The Protocol Templates window can also be accessed from the Actions menu.
Optimizing entitlements
If you have the Optimizer feature license, you will see the Score column on the Entitlements page. Optimizer continuously analyzes every entitlement to determine where it is overexposed and then assigns it an optimization score.
Selecting the optimization score opens the Optimization Score Details window. This window provides information explaining the entitlement’s score, along with suggested optimizations.
For more information, see Optimizing entitlements.
Managing entitlements
Use the action button—the three dots icon ( ) to the right of each line item—to access the following options:
Enable/disable Entitlement Status. Turns the entitlement on or off.
View Policies linked by name. Lists policies that reference this entitlement by name.
View Policies linked by tag. Lists policies that reference this entitlement by tag.
Actions menu
In the top right of the Entitlements page, the Actions menu allows you to perform the following on one or more entitlements:
Import. Imports entitlements.
Protocol Templates. Appears when you have an Operational Technology feature license. Allows you to edit or add protocol templates to be used in entitlement actions.
Add and remove tags.
Enable and disable entitlements.
Merge entitlements. Merging requires that all selected entitlements are assigned to the same Site. When you merge, the following occurs:
A new, disabled named entitlement is created.
All actions from the selected entitlements are added to the new entitlement.
Conditions are merged using AND logic (all conditions must be true). Review and edit the merged conditions before enabling the entitlement.
The original entitlements are tagged for easy identification.
Change the entitlement’s Site.
Assign an entitlement to a policy. Create the target policy before performing this action. Only DNS and Access policy types appear in the suggestions.
Apply a condition to an entitlement. Applies a single condition to all selected entitlements. Any previously applied conditions are removed.
To always allow the action: select Always from the condition list. This effectively removes any existing condition in bulk.
To apply risk-based access: create a condition based on risk first, then select it here. This action does not configure the middle condition option.
To apply a specific condition: select from the list as currently shown.
To apply multiple conditions to an entitlement, either use this action to apply the first condition and then add the next condition manually, or create a more complex condition and apply that.
Export the entitlement.
Export optimization data. Appears when you have the Optimizer feature license. See Optimizing entitlements for more information.
Delete the entitlement.
The Actions menu from the Add/Edit Entitlement page allows you to clone, export, or delete the entitlement.